Table of Contents
Exercise 1
Now that we figured out how to do some failure handling, let's do an exercise! Move the bottle completely out of the reach of the robot. For example, place it at the kitchen island, near the narrower edge:
PP-TUT> (spawn-object '((-1.0 0.75 0.860) (0 0 0 1)))
Now, try to write a failure handling strategy to adjust the base pose of the robot so that it can once again grab the bottle. It should be able to grasp the object from both the old locations and the new ones. The easiest is to define a couple more base poses, as global variables/parameters, to try from.
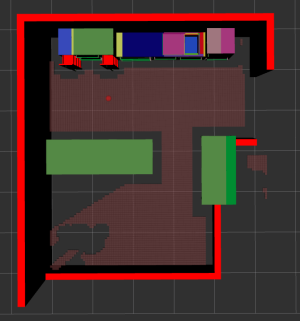
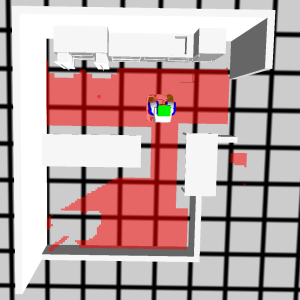
Whenever you command the robot to move somewhere, make sure that you are not asking him to leave the environment, PR2 cannot leave the premises of the room. The screenshot below is the top-view of the bullet world, where the red/brown region indicates the area where the PR2 is allowed to stand.
Here is a simple plan of action for this exercise:
- Using
defparameter, define three-four additional base poses for the robot to stand near different surfaces, where objects can potentially be standing. Make sure that your pose is feasible byperforming thegoingaction with the?goalbeing your defined new pose. - Find the current implementation of
move-objectthat we used last. - Wrap the part of
move-objectwherefind-objecthappens into ahandle-failureclause, which sends the robot to a different location and retries. You can put yourhandle-failureright inside thelet, or you can define an intermediatefind-object-with-base-movement, which does the base retries and callsfind-objectinside.
If you decide to do your handle-failure right inside the let, it can look as following:
(let ((?perceived-bottle

        (let ((my-new-awesome-lists ...)...)
          (handle-failure ...
             ((find-object ...))
            (do-the-handling)))

      (?and-the-other-variables ...))
  (the-insides-of-the-outer-let))
This might look very weird to a person, who's used to traditional imperative programming style, but in functional programming this is totally possible and readable, if you use enough white space ;).
Exercise 1-B (Difficulty level: Advanced): To increase the complexity, try to write a function that can calculate a good base position for any location of the object, such that you are now not hardcoding the base poses but calculating them depending on the object pose. With that the robot should be able to grasp the object from any location on any of the two tables.
Exercise 2
Until now, we did not care about the order of different things that we try out. For example, we always first try to pick up the object with the right arm, and only if that fails, with the left arm. But what if it is more or less obvious, that the object is easier grasped with the left arm, for example, in case the object is on the far left side of the robot.
So, let us suggest the robot a good arm to start with, and if that doesn't work, we can always fall back to the alternative arm.
For that, check the base pose of the robot and the relative pose of the bottle and see if you can write a method which suggests which arm to use to pick up, depending on the relative position of the bottle.
Here are the steps for solving this exercise:
- Define a new function called
get-preferred-arm, which as an argument gets an object description thatfind-objectreturns. - Inside the function, find the object pose in the map frame:
map-P-object. - Also, find the robot transform in map frame:
map-T-robot. - Invert the robot transform to get
robot-T-map. - Multiply inverted robot transform with object transform to get the object pose relative to the robot:
robot-T-map * map-P-object = robot-P-object. - Use the X and Y coordinates of the object pose to decide which arm to use.
You can use the following helper functions to solve this exercise:
;; gets a description of an object from FIND-OBJECT and returns the name, e.g., 'bottle-1
(get-object-name PERCEIVED-OBJECT-DESCRIPTION)

;; returns a pose in the "map" frame of an object, given its name, e.g., 'bottle-1
(get-current-pose-of-object OBJECT-NAME)

;; returns the transformation from robot frame into map frame, i.e., map-T-robot
(get-robot-transformation)

;; inverts a transform, i.e. x-T-y turns into y-T-x
(inverse-transformation TRANSFORM)

;; multiplies given TRANSFORM with POSE, i.e. x-T-y * y-P-z = x-P-z
(apply-transformation transform pose)

;; returns the X component of a pose, e.g., for a '((1 2 3) (0 0 0 1)) that would be 1
(get-x-of-pose POSE)

;; returns the Y component of a pose, e.g., for a '((1 2 3) (0 0 0 1)) that would be 2
(get-y-of-pose POSE)
Exercise 3
When an object cannot be found even though we looked into three different directions, one other thing that can help is to move the torso up and down to increase the field of view even more.
Here's how we should do it:
- Find the previous implementation of FIND-OBJECT that we used.
- Create a list of possible torso positions: we could start with 0, then retry with 0.1, 0.2 and 0.3.
- Wrap the detecting action, which was already wrapped with a failure handling for looking in different directions, into yet another
handle-failureforobject-nowhere-to-be-foundfailure, because this is the failure that we throw if all looking directions fail. - When implementing your failure handling, make sure that you reset the looking directions list and the variable, because otherwise the robot will think that he exhausted all the looking directions and will only look straight after you have moved the torso.
Defining a New Grasp
We discussed predefined possible grasps for a bottle in the previous section, which were 4 in number. Even though there are a lot of different possible grasps in real life, using only 4 limits our possible ways of grasping the bottle. So can we add more? Of course! Let's see that in this section. Let's try to grasp the bottle diagonally between positive x and y axes. We'll call this the front-left-diagonal grasp.
The grasps are defined as obj_T_grp, that is, as the coordinate frame of the gripper with respect to the object. That is, all the grasps are defined in the object coordinate frame. It is important to note that the more uniformly the coordinate frames of the manipulated objects are defined in a robotic system, the easier it will be to define generic grasps for them. In our system, we define the origin of the object coordinate frame as the center of the bounding box of the object. For the orientation, we typically choose Z to point upwards, whereby the object is oriented as it would be typically standing on a supporting surface. The X is usually either the longer principle axis of the object, or the axis from the handle towards the head of the object. Defining X and Y is more ambiguous, and we will not discuss this issue deeper in this tutorial.
The gripper frame in obj_T_grp is typically the tool frame of the gripper.
There are two things that need to be calculated for any grasp pose: the translation the gripper will have to make to perform the grasp and the orientation the gripper will have to make to match the grasp that is to be performed.
To calculate the translation part, we'll define some offsets as parameters. The values are taken from the predefined grasp offset values in <your workspace>/cram/cram_knowrob/cram_knowrob_pick_place/src/grasping.lisp
(defparameter *lift-z-offset* 0.15 "in meters")
(defparameter *lift-offset* `(0.0 0.0 ,*lift-z-offset*))

(defparameter *bottle-pregrasp-xy-offset* 0.15 "in meters")
(defparameter *bottle-grasp-xy-offset* 0.02 "in meters")
(defparameter *bottle-grasp-z-offset* 0.005 "in meters")
For the orientation, we need to know the coordinate frame of the object and the gripper in order to define a grasp.
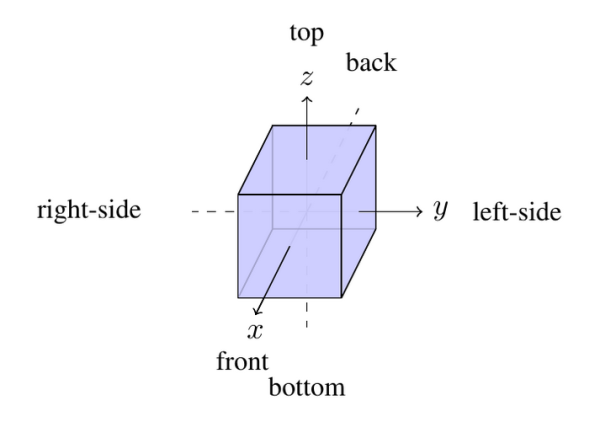
A front-left-diagonal grasp means that the gripper has to come from the positive x and y-axis side of the object.
You car refer to the image below again to see what axes correspond to what face of the object.
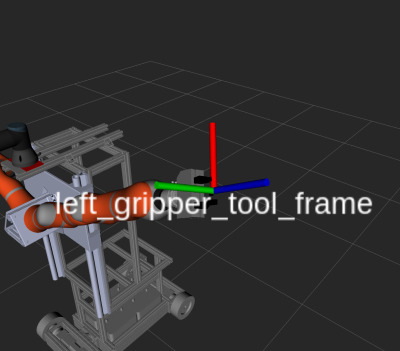
The coordinate frame of a standard two-finger parallel gripper is defined as following: Z-axis points towards the object, X is defined along the translation of the fingers (the axis that connects the left and the right finger), and Y is defined according to the right-hand rule. For example, below you can see the frames of our Boxy robot's grippers, which are popular industrial parallel grippers (manufactured by Schunk or Weiss, we use both interchangeably):
Thus, to make the front-left diagonal grasp, the Z-axis of the gripper should point 45 degrees in between the X and Y-axes of the object. And since we are grasping across the Z-axis of the bottle (the bottle is standing along the z-axis), we'll keep the X axis perpendicular to the Z-axis of the bottle and the Y of the gripper aligned with the Z of the bottle.
(defparameter *sin-pi/4* (sin (/ pi 4)))
(defparameter *-sin-pi/4* (- (sin (/ pi 4))))

(defparameter *diagonal-rotation*
        `((,*sin-pi/4* 0 ,*-sin-pi/4*)
          (,*-sin-pi/4* 0 ,*-sin-pi/4*)
          (0 1 0)))
The rotation matrix given above is the rotation matrix required to bring the gripper from the identity pose to the pose that we need to make a left-diagonal grasp. This is achieved by rotating the identity pose around the x-axis by +90 degrees first, and then rotating the new pose around the new Y-axis by -45 degrees. Try to visualize these rotations mentally. Note:-Since sin(pi/4) = cos(pi/4), we have only defined one variable and used it interchangeably in the defined rotation matrix
Now let's define the method that tie up all this and let CRAM know that a new grasp is available
(cram-object-interfaces:def-object-type-to-gripper-transforms '(:drink :bottle) '(:left :right) :fl-diagonal
  :grasp-translation `(,(- *bottle-grasp-xy-offset*) ,(- *bottle-grasp-xy-offset*) ,*bottle-grasp-z-offset*)
  :grasp-rot-matrix *diagonal-rotation*
  :pregrasp-offsets `(,*bottle-pregrasp-xy-offset* ,*bottle-pregrasp-xy-offset* ,*lift-z-offset*)
  :2nd-pregrasp-offsets `(,*bottle-pregrasp-xy-offset* ,*bottle-pregrasp-xy-offset* 0.0)
  :lift-offsets *lift-offset*
  :2nd-lift-offsets *lift-offset*)
The summary of this code is pretty simple, we have defined a grasp called fl-diagonal for objects drink and bottle, which can be accessed with the left or right arm of the robot. The pre-grasp offset gives you the distance the gripper will be positioned before the grasp. The grasp-translation gives the translation that the gripper will perform during the grasping. You can see that they're coming from the positive x and y axis and closing that distance during translation. The grasp-rot-matrix gives the orientation required for gripping.
Now that we have defined our new grasp let's see it in action. First, spawn the bottle again and position the robot ready to pick up.
(spawn-object '((-1.6 -0.9 0.82) (0 0 0 1)))
  (pr2-proj:with-simulated-robot
    (let ((?navigation-goal *base-pose-near-table*))
      (cpl:par
        (exe:perform (desig:a motion
                              (type moving-torso)
                              (joint-angle 0.3)))
        (park-arms)
        ;; Moving the robot near the table.
        (exe:perform (desig:a motion
                              (type going)
                              (target (desig:a location
                                               (pose ?navigation-goal)))))))
    ;; Looking towards the bottle before perceiving.
    (let ((?looking-direction *downward-look-coordinate*))
      (exe:perform (desig:a motion
                            (type looking)
                            (target (desig:a location
                                             (pose ?looking-direction))))))
    ;; Detect the bottle on the table.
    (setf *perceived-bottle* (exe:perform (desig:a motion
                                                   (type detecting)
                                                   (object (desig:an object
                                                                     (type :bottle)))))))
Now let's call the pick-up action with the grasp fl-diagonal as we have defined.
(pr2-proj:with-simulated-robot
  (let ((?perceived-bottle *perceived-bottle*))
    (exe:perform (desig:an action
                           (type picking-up)
                           (arm right)
                           (grasp fl-diagonal)
                           (object ?perceived-bottle)))))
You will see that PR2 will successfully grasp the bottle from the grasp pose that we defined. Another useful documentation on this point is http://cram-system.org/doc/package/cram_designators. Here you can understand further what the 'desig:an' does and why we use it. Designators are a very useful thing in cram, furthermore they are used in every high-level plan.
To visualize the gripper coordinates, you can always use the following call of the visualize-coordinates function:
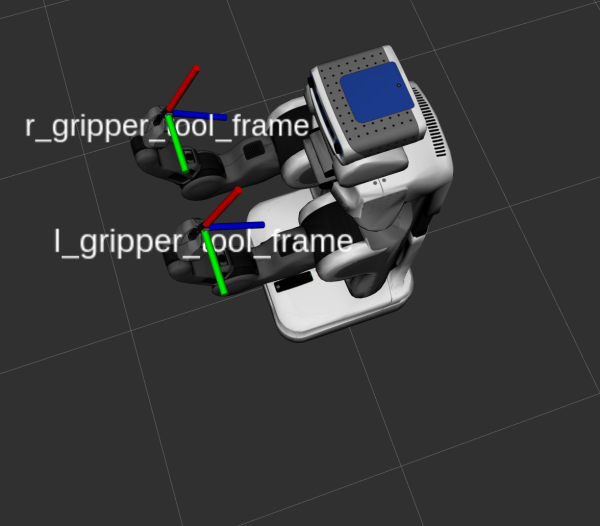
(visualize-coordinates (btr:link-pose (btr:get-robot-object) "r_gripper_tool_frame"))
where “r_gripper_tool_frame” is the name of PR2's right gripper tool frame. The left gripper's tool frame is called, correspondingly, “l_gripper_tool_frame”.
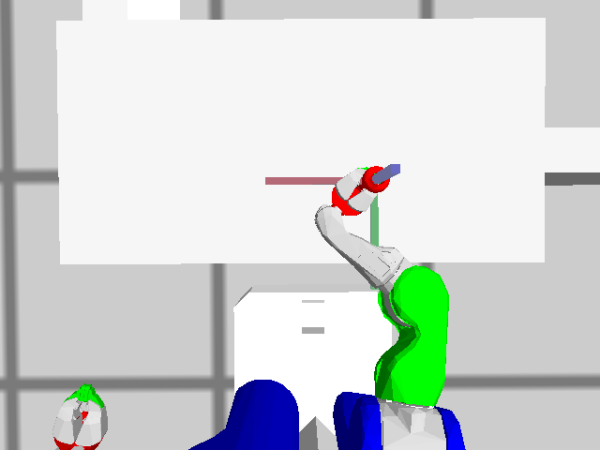
There is one caveat: PR2's gripper coordinate frame is not defined according to the common industry standard that we just described. But in order to keep our grasps applicable to any gripper, we define the grasps for the standard gripper and each robot that transforms the standard grasp into its own gripper frame. Therefore, even if we're defining the grasps for the PR2, whose gripper frames are defined as following:
we still define them for a standard gripper coordinate frame. PR2 transforms our standard grasp into its own grasp under the hood through the CRAM hardware abstraction layer.
Exercise 4
Difficulty level: Medium.
Now that we learned how to define new grasps, try to define your own! A top grasp should be a simple one: you need to align the direction of the gripper with the negative Z axis of the object. The Z axis of the object is the one that looks from bottom to top and you want the gripper to look from top to bottom.
Exercise 5
Difficulty level: Advanced.
Even though we already covered a lot of scenarios here, there are many more things that can be added and handled. One of the advanced things that you could do is: if an object placement location is unreachable with the current grasp, try to place it down somewhere intermediately and regrasp it in a different way.

